
Strijkfunctie: zelfs beginners kunnen het bovenoppervlak van modellen gladstrijken
Is uw model over het algemeen goed, maar wordt het ontsierd door kleine streepjes die het oppervlak minder dan perfect maken? De strijkfunctie in
Nadat de bovenste laag van het model is geprint, blijft de spuitmond met een extreem lage snelheid heen en weer bewegen – net zoals bij het strijken van kleding met een elektrische strijkijzer. Door deze beweging smelt en strijkt de kleine hoeveelheid geëxtrudeerd filament plat, waardoor de openingen tussen de lijnen worden opgevuld en een veel gladder oppervlak ontstaat. De strijkfunctie is ideaal voor modellen met een vlak bovenoppervlak, vooral wanneer hoge esthetische eisen worden gesteld.. Het is echter van weinig nut voor modellen met gebogen bovenkanten, puntige bovenkanten of ingewikkelde details; in dergelijke gevallen zal het de printtijd alleen maar onnodig verlengen.
Schematisch diagram
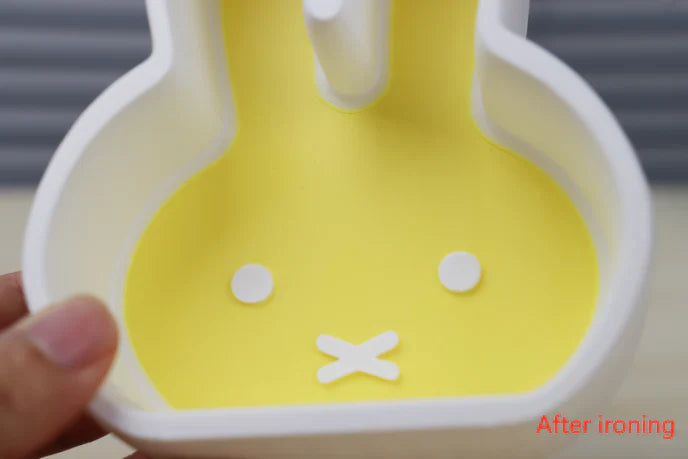
Vergelijking voor en na het strijken:


Bedieningshandleiding
1. Schakel de strijkfunctie in.
De strijkfunctie is standaard uitgeschakeld in

Er zijn twee veelgebruikte strijkmethoden, met de volgende verschillen:
- Bovenoppervlakken: Alle bovenvlakken van het model worden gestreken.
- Bovenste oppervlak: Als het model verschillende hoogtes heeft, wordt alleen de hoogste laag (i.e. (De laatst bedrukte laag) wordt gestreken.


2. Stel de belangrijkste parameters in
Strijkpatroon
Er zijn twee patronen beschikbaar: Rechtlijnig En Concentrisch.
- Rechtlijnig: De meest gebruikte optie, met een grote veelzijdigheid.
- Concentrisch: Geeft mogelijk betere strijkresultaten aan de randen van het bovenoppervlak, maar laat doorgaans een klein stipje achter in het midden van het model.


Strijksnelheid
Verwijst naar de bewegingssnelheid van het mondstuk tijdens het strijken, met een standaardwaarde van 30 mm/s. Zoals het spreekwoord luidt: "langzaam werken levert mooie resultaten op"—een lager tempo leidt meestal tot betere strijkresultaten.
Strijkdebiet
Dit verwijst naar de extrusiesnelheid van het filament tijdens het strijken, en deze waarde is relatief ten opzichte van de doorstroomsnelheid die wordt gebruikt voor normaal printen. Als u merkt dat er materiaalophoping is na het strijken, verlaag dan de doorstroomsnelheid; als er gaten blijven zitten, verhoog dan de doorstroomsnelheid dienovereenkomstig.


Strijklijnafstand
Over het algemeen geldt: hoe kleiner de afstand tussen de strijkbanen, hoe beter het strijkeffect. Echter, als de doorstroomsnelheid te hoog is en de afstand te klein, kan dit leiden tot overextrusie, waardoor de oppervlakteafwerking wordt beschadigd of zelfs de reeds geprinte onderdelen worden afgeschraapt.


Strijkinzet
Deze waarde geeft de afstand aan tussen het strijkgebied en de contourgrens. Door deze waarde aan te passen naar een geschikte waarde kan ophoping van materiaal aan de randen worden voorkomen.


Aanbevolen werkwijzen voor het gebruik van de strijkfunctie
Om optimale strijkresultaten te bereiken, dient u rekening te houden met de volgende belangrijke punten: gebruik een lage snelheid, stel een smalle regelafstand in, En De doorstroomsnelheid nauwkeurig afstemmen op de werkelijke omstandigheden.. Als je een model wilt printen met een perfect afgewerkt "plafond" (bovenvlak), aarzel dan niet om de strijkfunctie te proberen!