Q2
Q2
 Plus4
Plus4
 QIDI Box
 Q1Pro
Q1Pro
 Max3
Max3
 I-Fast
How to Add Supports to Your Model?
In 3D printing, we often encounter situations where the model has large overhanging parts. If these parts are not properly supported, the printing effect may be affected or even cause printing failure.
To solve this problem, we need to add supports to the model. This article will give you a detailed introduction on how to add supports, including using automatic supports, manually painting supports, blocking unnecessary supports, introducing the difference between normal supports and tree supports, and how to adjust parameters to optimize printing effects. The software used in this article is QIDI Studio.
How to Use Automatic Support?
Automatic support is an efficient and convenient way to generate support. The slicer will automatically calculate and generate the appropriate support type according to the overhanging structure of the model. So, how to use automatic support correctly?
As shown below,
(1) Enter the support settings interface and select "Enable Support".
(2) Select "Tree (auto)" or "Normal (auto)" in the support type. The two types of support depend on the support surface of the model, which will be mentioned below.

After completing the settings, click "Slice plate". The slicer will automatically generate supports based on the model structure. In the slice preview, you can clearly see the green tree support structure. These supports will be printed and generated simultaneously during the printing process to provide stable support for the overhanging part of the model and ensure better printing results.
How to Paint Supports Manually?
Although automatic support is more convenient, it may sometimes generate redundant supports or lack key supports, which will greatly affect the printing effect. Manually painting supports allows users to more accurately control the generation position of supports, which is suitable for scenes that require fine adjustments.
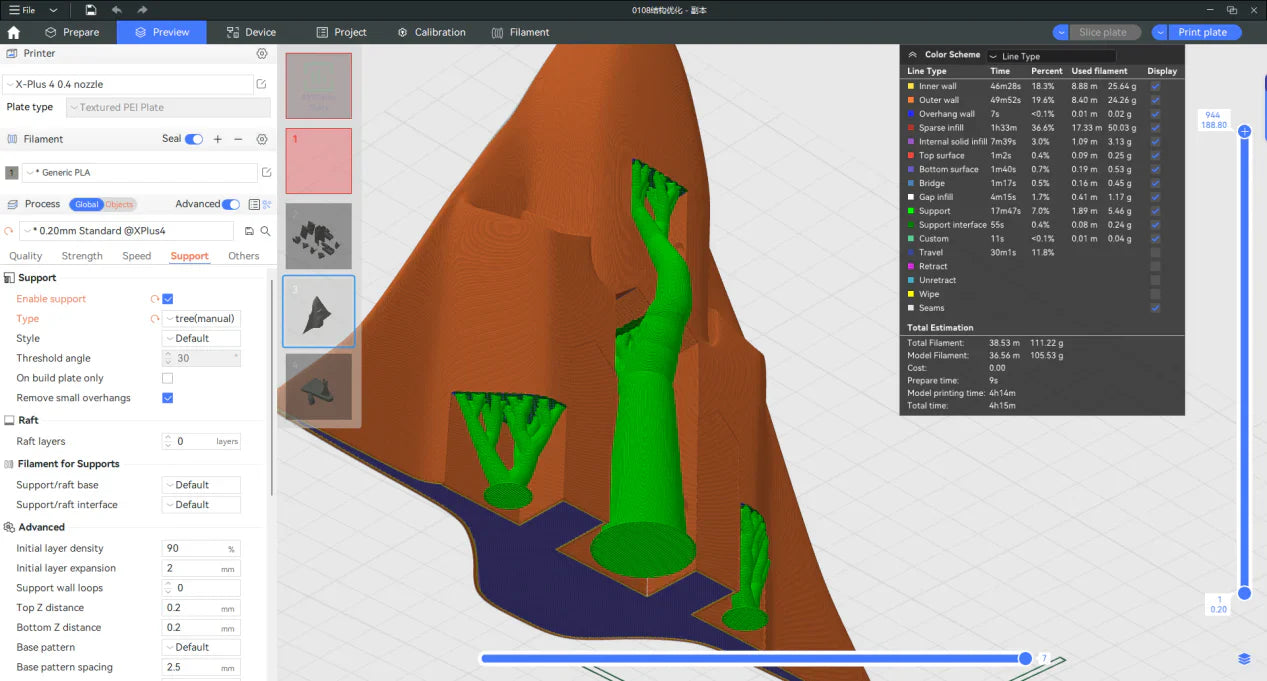
First, open the support painting interface as shown below:
- Enter the support setting interface and select "Enable support".
- Select "Tree (manual)" or "Normal (manual)" in the support type.
- Click "Supports Painting" to enter the support painting interface.

In the support painting interface,
- Adjust the parameters of "Highlight overhang areas" to better distinguish the overhanging areas of the model.
- Select this "Circle" tool to smear the model. The system will automatically generate supports for the smeared areas.
- Select this "Fill" tool and click on the overhanging area on the model to mark the support area. The system will automatically generate supports for the entire area.

Taking the model shown below as an example, there are four overhanging surfaces that need to be paintn for support. Marks 1, 2, and 3 are support surfaces generated by the fill tool, and mark 4 is the support surface paintn with the circle tool.

After slicing, the preview of the model is as follows. You can see that supports are generated on the all marked areas.

How to Block Support?
In some cases, the supports generated by the software may be redundant, which will increase the probability of model printing failure and may interfere with the model's original function. In this case, the blocking function can be used to remove the supports in specific areas to avoid unnecessary filament waste and function affecting.
As shown below, select the model, right-click and select "Add Support Blocker", and select the appropriate blocker shape.

Adjust the position and size of the blocker so that it is located in areas of the model that do not require support.

After slicing, compared with the model without adding support blockers, we will find that the supports at the corresponding position of the model disappear.


What is the Difference Between Normal Support and Tree Support in 3D Printing?
Normal support and tree support are two common types of support, each with its own advantages and disadvantages.
Normal support has a simple structure and can provide very reliable support for simple large-area overhang structures.
Tree support saves more filaments, is easy to disassemble, and is more friendly to complex models, but may not provide very reliable support for large-area overhang structures.
The following is a comparison of the characteristics of the two types of supports:
|
Support Type |
Normal |
Tree |
|
Structure |
Grid, regularly arranged |
Branch, consisting of a trunk and branches |
|
Filament Use |
Relatively more |
More savings |
|
Application Scope |
Suitable for models with regular and large overhangs areas |
Suitable for models with complex and small overhanging parts |
|
Support Removal |
Difficult to remove, easy to leave marks on the supporting surface |
Easier to remove, reducing support surface damage |
|
Suitable for Complex Shapes |
Not very suitable for models with complex or detailed parts |
Great for models with complex shapes or requiring fine support |
Tree support:

Normal support:

How to Adjust 3D Printing Support Parameters to Solve Common Printing Issues?
The printing parameters of the support have an important impact on the final effect. By adjusting the top Z distance, support diameter and other parameters, you can effectively solve problems such as support difficult to remove, tree support collapse leading to printing failure, etc.
As shown below, Mark 1 is the top Z distance. The larger the value, the farther the end of the support will be from the surface of the model, and the easier it is to remove the support. However, too large a value may result in poor support effect.
Mark 2 is the branch diameter. The larger the value, the larger the diameter of the tree support and the greater its strength. This can solve the problem of printing failure caused by the collapse of the tree support during printing in some cases.

As shown below, when the branch diameter is increased, we can easily see that the tree support becomes thicker.

The above is a comprehensive tutorial on adding supports to models. We hope the content of this article can help you better understand and use the support function, making your 3D printing smoother and more efficient. If you have more questions or experiences, please share them in the community. Let's explore more possibilities of 3D printing together!