
¿Cómo agregar soportes a su modelo?
En la impresión 3D, a menudo nos encontramos con modelos que presentan grandes partes sobresalientes. Si estas partes no están bien sujetas, el resultado de la impresión puede verse afectado o incluso provocar un fallo en la misma.
Para resolver este problema, necesitamos agregar soportes al modelo. Este artículo le brindará una introducción detallada sobre cómo agregar soportes, incluyendo el uso de soportes automáticos, el pintado manual de soportes, el bloqueo de soportes innecesarios, la introducción de la diferencia entre soportes normales y soportes de árbol, y cómo ajustar los parámetros para optimizar los efectos de impresión. El software utilizado en este artículo es
¿Cómo utilizar el soporte automático?
El soporte automático es una forma eficiente y práctica de generar soportes. El segmentador calculará y generará automáticamente el tipo de soporte adecuado según la estructura sobresaliente del modelo. Entonces, ¿cómo usar el soporte automático correctamente?
Como se muestra a continuación,
(1) Acceda a la interfaz de configuración de soporte y seleccione "Habilitar soporte".
(2) Seleccionar "Árbol (automático)" o "Normal (automático)" en el tipo de soporte. Los dos tipos de soporte dependen de la superficie de soporte del modelo, que se mencionará más adelante.

Después de completar la configuración, haga clic en "Plato de rebanadas". El segmentador generará automáticamente soportes en función de la estructura del modelo. En la vista previa del segmento, se puede ver claramente el color verde. Estructura de soporte para árboles. Estos soportes se imprimirán y generarán simultáneamente durante el proceso de impresión para proporcionar un apoyo estable a la parte sobresaliente del modelo y garantizar mejores resultados de impresión.
¿Cómo pintar soportes manualmente?
Si bien el soporte automático es más práctico, a veces puede generar soportes redundantes o carecer de soportes clave, lo que afecta considerablemente el resultado de la impresión. Pintar los soportes manualmente permite a los usuarios controlar con mayor precisión su posición, lo cual resulta ideal para escenas que requieren ajustes precisos.
Primero, abra la interfaz de pintura de soporte como se muestra a continuación:
- Acceda a la interfaz de configuración de soporte y seleccione "Habilitar soporte".
- Seleccionar "Árbol (manual)" o "Normal (manual)" en el tipo de soporte.
- Hacer clic "Apoya la pintura" para acceder a la interfaz de pintura de soporte.

En la interfaz de pintura de soporte,
- Ajustar los parámetros de "Resaltar las zonas con voladizos" para distinguir mejor las zonas sobresalientes del modelo.
- Seleccione esto "Círculo" Herramienta para difuminar el modelo. El sistema generará automáticamente soportes para las áreas difuminadas.
- Seleccione esto "Llenar" Seleccione la herramienta y haga clic en la zona sobresaliente del modelo para marcar el área de soporte. El sistema generará automáticamente los soportes para toda la zona.

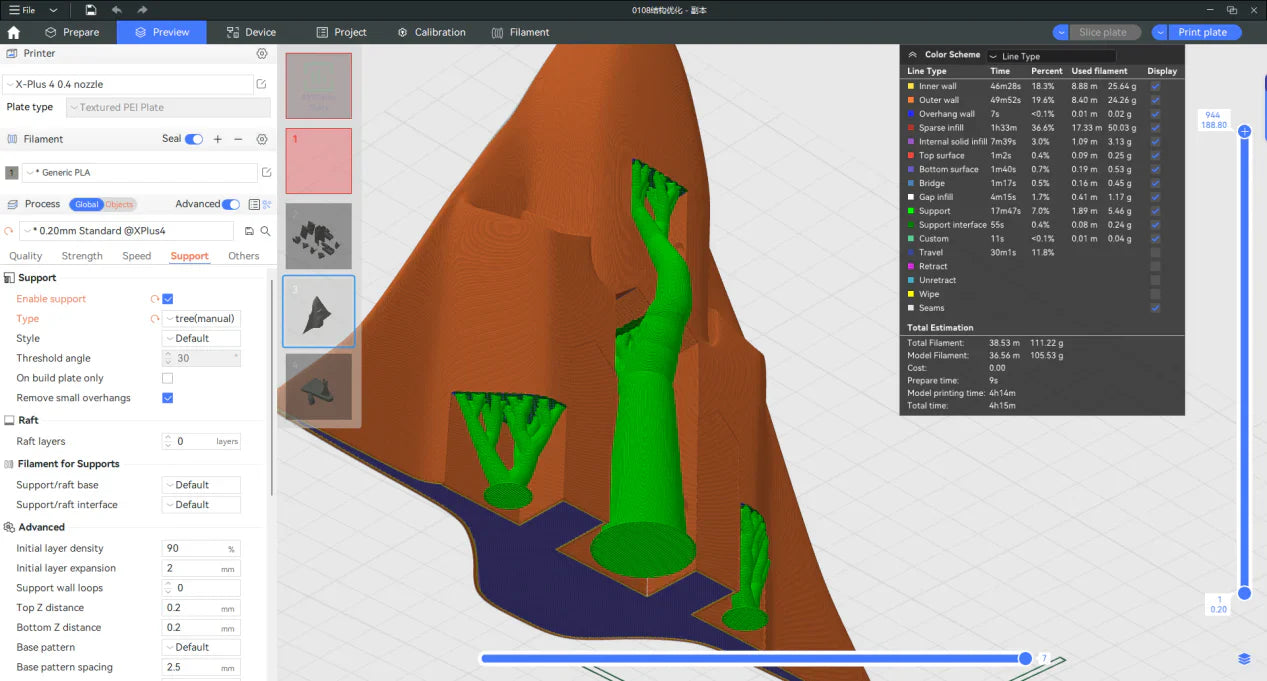
Tomando como ejemplo el modelo que se muestra a continuación, hay cuatro superficies sobresalientes que deben pintarse para servir de soporte. Las marcas 1, 2 y 3 son superficies de soporte generadas con la herramienta de relleno, y la marca 4 es la superficie de soporte pintada con la herramienta de círculo.

Tras el corte, la vista previa del modelo es la siguiente. Como puede observar, se generan soportes en todas las áreas marcadas.

¿Cómo bloquear el soporte?
En algunos casos, los soportes generados por el software pueden ser redundantes, lo que aumenta la probabilidad de fallos en la impresión del modelo y puede interferir con su funcionamiento original. En este caso, se puede utilizar la función de bloqueo para eliminar los soportes en áreas específicas y evitar así el desperdicio innecesario de filamento y posibles problemas de funcionamiento.
Como se muestra a continuación, seleccione el modelo, haga clic con el botón derecho y seleccione "Agregar soporte" Bloqueador", y seleccione la forma de bloqueador adecuada.

Ajusta la posición y el tamaño del bloqueador para que se ubique en áreas del modelo que no requieran soporte.

Tras realizar el seccionamiento, en comparación con el modelo sin añadir bloqueadores de soporte, observaremos que los soportes en la posición correspondiente del modelo desaparecen.


¿Cuál es la diferencia entre el soporte normal y el soporte de árbol en la impresión 3D?
El soporte normal y el soporte de árbol son dos tipos comunes de soporte, cada uno con sus propias ventajas y desventajas.
El soporte normal tiene una estructura simple y puede proporcionar un soporte muy fiable para estructuras sencillas de grandes voladizos.
El soporte para árboles ahorra más filamentos, Es fácil de desmontar y resulta más adecuado para modelos complejos, pero puede que no proporcione un soporte muy fiable para estructuras con grandes voladizos.
A continuación se presenta una comparación de las características de los dos tipos de soportes:
| Tipo de soporte | Normal | Árbol |
| Estructura | Red, dispuesta regularmente | Rama, que consta de un tronco y ramas. |
| Uso de filamentos | Relativamente más | Más ahorros |
| Ámbito de aplicación | Adecuado para modelos con voladizos regulares y grandes. | Adecuado para modelos con piezas pequeñas y complejas que sobresalen. |
| Extracción de soporte | Difícil de eliminar, deja marcas fácilmente en la superficie de soporte. | Más fácil de quitar, lo que reduce los daños en la superficie de soporte. |
| Adecuado para formas complejas | No es muy adecuado para modelos con piezas complejas o detalladas. | Ideal para modelos con formas complejas o que requieren un soporte fino. |
Soporte para árboles:

Soporte normal:

¿Cómo ajustar los parámetros de soporte de la impresión 3D para solucionar problemas comunes de impresión?
Los parámetros de impresión del soporte influyen significativamente en el resultado final. Ajustando la distancia Z superior, el diámetro del soporte y otros parámetros, se pueden solucionar eficazmente problemas como la dificultad para retirar el soporte o el colapso del mismo que provoca fallos de impresión.
Como se muestra a continuación, la marca 1 representa la distancia Z superior. Cuanto mayor sea este valor, más alejado estará el extremo del soporte de la superficie del modelo y más fácil será retirarlo. Sin embargo, un valor demasiado grande puede resultar en un soporte deficiente.
La marca 2 representa el diámetro de la rama. Cuanto mayor sea este valor, mayor será el diámetro del soporte del árbol y mayor su resistencia.Esto puede solucionar el problema de fallos de impresión causados, en algunos casos, por el colapso del soporte del árbol durante la impresión.

Como se muestra a continuación, al aumentar el diámetro de la rama, podemos observar fácilmente que el soporte del árbol se vuelve más grueso.

El artículo anterior es un tutorial completo sobre cómo agregar soportes a los modelos. Esperamos que el contenido de este artículo pueda ayudarle a comprender y utilizar mejor el función de soporte, Haciendo que tu impresión 3D sea más fluida y más eficiente. Si tienes más preguntas o experiencias, compártelas en la comunidad. ¡Exploremos juntos más posibilidades de la impresión 3D!
- ¿Cómo utilizar el soporte automático?
- ¿Cómo pintar soportes manualmente?
- ¿Cómo bloquear el soporte?
- ¿Cuál es la diferencia entre el soporte normal y el soporte de árbol en la impresión 3D?
- ¿Cómo ajustar los parámetros de soporte de la impresión 3D para solucionar problemas comunes de impresión?
Productos recomendados